
1426 lines
66 KiB
Markdown
Executable File
1426 lines
66 KiB
Markdown
Executable File
---
|
||
标题: 为什么家用摄像头基本上都不支持onvif/rtsp协议呢? - 知乎
|
||
笔记ID: HHM6F8K
|
||
笔记类型: page
|
||
星标: false
|
||
tags:
|
||
域名: www.zhihu.com
|
||
域名2: zhihu.com
|
||
作者: ""
|
||
原文链接: https://www.zhihu.com/question/404251421
|
||
五彩链接: https://marker.dotalk.cn/#/?nx=HHM6F8K&vs=1
|
||
划线数量: 0
|
||
创建时间: 2025-09-22 12:21
|
||
更新时间: 2025-09-22 12:22
|
||
created: 2025-09-22T12:26
|
||
updated: 2025-09-25T12:35
|
||
---
|
||
|
||
## 为什么家用摄像头基本上都不支持onvif/rtsp协议呢? - 知乎
|
||
|
||
|
||
## 页面笔记
|
||
|
||
|
||
## 划线列表
|
||
|
||
## 全文剪藏
|
||
### **1.1形成**
|
||
|
||
2008年5月,由安讯士(AXIS)联合博世(BOSCH)及索尼(SONY)公司三方宣布携手共同成立一个国际开放型网络视频产品标准网络接口开发论坛,取名为ONVIF(Open Network Video Interface Forum,开放型网络视频接口论坛),并以公开、开放的原则共同制定开放性行业标准。ONVIF标准将为网络视频设备之间的信息交换定义通用协议,包括装置搜寻、实时视频、音频、元数据和控制信息等。截止到2011年3月,已有279个公司加入ONVIF成为会员。
|
||
|
||
2008年11月,论坛正式发布了ONVIF第一版规范。
|
||
|
||
2010年11月,论坛发布了ONVIF第二版规范。规范涉及设备发现、实时音视频、摄像头[PTZ控制](https://zhida.zhihu.com/search?content%5Fid=507042259&content%5Ftype=Answer&match%5Forder=1&q=PTZ%E6%8E%A7%E5%88%B6&zhida%5Fsource=entity)、录像控制、视频分析等方面。
|
||
|
||
### **1.2规范作用**
|
||
|
||
ONVIF规范描述了网络视频的模型、接口、数据类型以及数据交互的模式。并复用了一些现有的标准,如WS系列标准等。ONVIF规范的目标是实现一个网络视频框架协议,使不同厂商所生产的网络视频产品(包括摄录前端、录像设备等)完全互通。
|
||
|
||
ONVIF规范中设备管理和控制部分所定义的接口均以[Web Services](https://zhida.zhihu.com/search?content%5Fid=507042259&content%5Ftype=Answer&match%5Forder=1&q=Web+Services&zhida%5Fsource=entity)的形式提供,设备作为服务提供者为服务端。ONVIF规范涵盖了完全的XML及WSDL的定义。每一个支持ONVIF规范的终端设备均须提供与功能相应的Web Service。服务端与客户端的数据交互采用SOAP协议。ONVIF中的其他部分比如音视频流则通过RTP/RTSP进行 。
|
||
|
||
### **1.3规范优势**
|
||
|
||
协同性:不同厂商所提供的产品,均可以通过一个统一的“语言”来进行交流。方便了系统的集成。
|
||
|
||
灵活性:终端用户和集成用户不需要被某些设备的固有解决方案所束缚。大大降低了开发成本。
|
||
|
||
质量保证:不断扩展的规范将由市场来导向,遵循规范的同时也满足主流的用户需求。
|
||
|
||
由于采用WSDL+XML模式,使ONVIF规范的后续扩展不会遇到太多的麻烦。XML极强的扩展性与SOAP协议开发的便捷性将吸引更多的人来关注和使用ONVIF规范。
|
||
|
||
ONVIF组织日益扩大,与同领域的PSIA,HDCCTV相比,占据了绝对的人员优势。会员企业不乏国内外著名的设备制造商与集成商。一套规范、协议的生命周期,与市场占有率是息息相关的。而ONVIF规范的发展则正是由市场来导向,由用户来充实的。每一个成员企业都拥有加强、扩充ONVIF规范的权利。ONVIF规范所涵盖的领域将不断增大。目前门禁系统的相关内容也即将被纳入ONVIF规范之中。在安防、监控系统急速发展的今天,效率和质量的领先所带来的价值不言而喻。ONVIF协议提供了这样的潜质。
|
||
|
||
### **1.4技术理解**
|
||
|
||
ONVIF = 服务端 + 客户端 =(Web Services + RTSP)+ 客户端 = ((WSDL + SOAP) + RTSP) + 客户端
|
||
|
||
WSDL是服务端用来向客户端描述自己实现哪些请求、发送请求时需要带上哪些参数xml组织格式;SOAP是客户端向服务端发送请求时的参数的xml组织格式
|
||
|
||
Web Services实现摄像头控制(比如一些参数配置、摄象头的上下左右(PTZ)控制);RTSP实现报像头视频传输
|
||
|
||
Web Services具摄像头控制具体到技术交互实现上,其实和http差不多,客户端以类似http post的格式向服务端发送请求,然后服务端响应客户端请求。
|
||
|
||
### 1.5.Profiles应用在哪里
|
||
|
||
* Profile S应用于网络视频系统
|
||
* [Profile G](https://zhida.zhihu.com/search?content%5Fid=507042259&content%5Ftype=Answer&match%5Forder=1&q=Profile+G&zhida%5Fsource=entity)应用于边缘存储与检索
|
||
* [Profile C](https://zhida.zhihu.com/search?content%5Fid=507042259&content%5Ftype=Answer&match%5Forder=1&q=Profile+C&zhida%5Fsource=entity)应用于网络电子门禁系统
|
||
* [Profile Q](https://zhida.zhihu.com/search?content%5Fid=507042259&content%5Ftype=Answer&match%5Forder=1&q=Profile+Q&zhida%5Fsource=entity)应用于快速安装
|
||
* [Profile A](https://zhida.zhihu.com/search?content%5Fid=507042259&content%5Ftype=Answer&match%5Forder=1&q=Profile+A&zhida%5Fsource=entity)应用于更广泛的访问控制配置
|
||
* [Profile T](https://zhida.zhihu.com/search?content%5Fid=507042259&content%5Ftype=Answer&match%5Forder=1&q=Profile+T&zhida%5Fsource=entity)应用于高级视频流
|
||
|
||
### 1.5.1 Profile S
|
||
|
||
`Profile S`就像是蜘蛛线身边忠实可靠的奈德,为网络视频系统的产品提供帮助:
|
||
|
||
1. 视频和音频流
|
||
2. PTZ控制和继电器输出
|
||
3. 视频配置和多播
|
||
Profile S应用于网络视频系统。Profile S的设备(例如:网络摄像机或视频编码器)可以将视频数据通过IP网络发送到Profile S的客户端。Profile S的客户端(例如:视频管理软件)可以配置、请求和控制从Profile S的设备上的IP网络视频流。
|
||
|
||
### 1.5.2 Profile G
|
||
|
||
Profile G看似平凡,却凭借着和寇森特工一样极强的行动能力,完美应用在网络视频系统的边缘存储与检索层面,特点包括:
|
||
|
||
1. 配置、请求、控制录像
|
||
2. 接收视频/音频流
|
||
Profile G应用于网络视频系统。Profile G设备(例如:网络摄像机或视频编码器)可以通过网络存储或本地存储录像。Profile G客户端(例如:视频管理软件)可以配置、请求和控制Profile G设备上的录像。
|
||
|
||
### 1.5.3 Profile C
|
||
|
||
在网络电子门禁系统中的贾维斯(最了解钢铁侠的智能管家)——Profile C,具备强大的系统管理功能,应用于:
|
||
|
||
1. 站点信息和配置
|
||
2. 事件和警报管理
|
||
3. 门禁控制
|
||
Profile C应用于电子门禁系统。Profile C设备和客户应支持站点信息、门禁控制、事件和报警管理。
|
||
|
||
### 1.5.4 Profile Q
|
||
|
||
快银——Profile Q凭借着出色的超速度,应用于快速安装领域:
|
||
|
||
1. 简单的设置
|
||
2. 发现、配置和控制设备
|
||
3. 先进的安全功能
|
||
Profile Q应用于网络视频系统,其目的是提供Profile Q产品的快速发现和配置(例如:网络摄像机、网络交换机、网络监视器)。Profile Q的客户端能够发现、配置和控制Profile Q设备。Profile Q也提供有条件的特点,支持传输层安全协议(TLS),允许ONVIF设备与客户端以防止篡改和窃听的安全方式进行网络通信。
|
||
|
||
### 1.5.5 Profile A
|
||
|
||
在更广泛的访问控制配置中的Profile A,凭借着如同皮姆博士掌握的超高科技,具备以下功能:
|
||
|
||
1. 授予/撤销证书
|
||
2. 创建时间表
|
||
3. 指定访问规则
|
||
Profile A应用于访问控制系统。Profile A的设备可以检索信息、状态和事件,并配置访问规则、凭据和时间表等。Profile A的客户端可以访问规则配置、凭据和时间表。Profile A客户端还可以检索和接收标准化的访问控制相关事件。
|
||
|
||
### 1.5.6 Profile T
|
||
|
||
Profile T-苏睿公主,有出色的视频管理能力,应用于高级视频流,特点包括:
|
||
|
||
1. 支持H.264/H.265视频压缩
|
||
2. 成像设置
|
||
3. 动作警报和篡改事件
|
||
4. 元数据流
|
||
5. 双向音频流
|
||
Profile T应用于高级视频流,具有高级视频流的能力,并且扩展了元数据流和分析的特征集。Profile T能更高效地处理高清摄像头的视频流,同时,还涵盖了元数据流HTTP/TLS流式传输、WebSocket流式传输,包括分析和事件。
|
||
|
||
## 二、ONVIF规范的实现机制
|
||
|
||
**Web service+WSDL+SOAP**
|
||
|
||
### 2.1 Web Service
|
||
|
||
Web Service是基于网络的、分布式的模块化组件,执行特定的任务。Web Service 主要利用HTTP 和SOAP 协议使数据在Web 上传输。Web 用户能够使用 SOAP 和 HTTP通过 Web 调用的方法来调用远程对象。
|
||
|
||
Web Service是基于XML和HTTPS的一种服务,其通信协议主要基于SOAP。服务端、客户端以传递符合XML的SOAP消息实现服务的请求与回应。
|
||
|
||
客户端根据 WSDL 描述文档,会生成一个 SOAP 请求消息,该请求会被嵌入在一个HTTP POST请求中,发送到 Web Services 所在的Web 服务器。Web Services 请求处理器解析收到的SOAP 请求,调用相应的 Web Services。然后再生成相应的 SOAP 应答。Web 服务器得到SOAP 应答后,会再通过 HTTP应答的方式把信息送回到客户端。
|
||
|
||
### 2.2 WSDL
|
||
|
||
WSDL是Web services 描述语言(Web Service Description Language)的缩写。是一个用来描述Web服务和说明如何与Web服务通信的XML语言,为用户提供详细的接口说明书。
|
||
|
||
### 2.3 SOAP
|
||
|
||
SOAP是Simple Object Access Protocol的缩写。是基于XML的一种协议。一条 SOAP 消息就是一个普通的 XML 文档,包含下列元素:
|
||
|
||
必需的 Envelope 元素,可把此 XML 文档标识为一条 SOAP 消息
|
||
|
||
可选的 Header 元素,包含头部信息
|
||
|
||
必需的 Body 元素,包含所有的调用和响应信息
|
||
|
||
可选的 Fault 元素,提供有关在处理此消息所发生错误的信息
|
||
|
||
在向Web Service发送的SOAP请求中,Body元素中的字段需与WSDL中数据类型的相符合。在构建SOAP的过程中,必须从WSDL文件中获取并映射这一种对应关系。然而这样一个对应过程将是充满了重复性和机械性的,为了避免不必要的人工差错以及节约开发时间,一个名为gSOAP的编译工具应运而生。
|
||
|
||
gSOAP利用编译器技术提供了一组透明化的SOAP API,并将与开发无关的SOAP实现细节相关的内容对用户隐藏起来。通过将WSDL文件解析序列化为C/C++文件,最小化了Web Service的开发过程。
|
||
|
||
### 2.4 ONVIF规范
|
||
|
||
ONVIF规范向视频监控引入了Web Service的概念。设备的实际功能均被抽象为了Web Service的服务,视频监控系统的控制单元以客户端的身份出现,通过Web请求的形式完成控制操作。
|
||
|
||
### 2.4.1 Web Service能为视频监控什么
|
||
|
||
* a) 设备的无关性,任何一个设备接入系统,不会对其他系统造成影响。
|
||
* b) 设备的独立性,每一个设备只负责对接收到的请求做出反馈,甚至不需要知晓控制端的存在。
|
||
* c) 管理的集中性,所有的控制由客户端来发起。
|
||
|
||
### 2.4.2 ONVIF规范能为视频监控带来什么
|
||
|
||
* a) 抽象了功能的接口。统一了对设备的配置以及操作的方式。
|
||
* b) 控制端关心的不是设备的型号,而是设备所提供的Web Service。
|
||
* c) 规范了视频系统中Web Service范围之外的行为。
|
||
* d) ONVIF提供了各个模块的WSDL,拥有效率非常高的开发方式。
|
||
|
||
## 三、ONVIF规范内容
|
||
|
||
* DeviceMgmt(设备管理)
|
||
* DeviceIO(设备IO服务)
|
||
* Event(事件处理)
|
||
* Analytics(视频分析)
|
||
* AnalyticsDevice(分析设备)
|
||
* Display(显示服务)
|
||
* Imaging(图像配置)
|
||
* Media(媒体配置)
|
||
* PTZ(PTZ控制)
|
||
* Receiver(接收端配置)
|
||
* RemoteDiscovery(设备发现)
|
||
* Recording(录像控制)
|
||
* Replay(重放控制)
|
||
* Search(记录搜索)
|
||
|
||
我们需要了解哪个能力的具体服务,则搜索对应的wsdl即可,比如变焦zoom属于PTZ能力的一部分,则直接搜索ptz.wsdl,而聚焦focus属于Imaging能力的一部分,则搜索Imaging.wsdl:
|
||
|
||
[http://www.onvif.org/ver20/ptz/wsdl/ptz.wsdl](https://link.zhihu.com/?target=http%3A//www.onvif.org/ver20/ptz/wsdl/ptz.wsdl)
|
||
|
||
[http://www.onvif.org/ver20/imaging/wsdl/imaging.wsdl](https://link.zhihu.com/?target=http%3A//www.onvif.org/ver20/imaging/wsdl/imaging.wsdl)
|
||
|
||
可以在这里找到所有的wsdl:官网地址:[网络接口规范 - ONVIF Mandarin](https://link.zhihu.com/?target=https%3A//www.onvif.org/ch/profiles/specifications/)
|
||
|
||
github地址:[GitHub - onvif/specs: Onvif Specifications](https://link.zhihu.com/?target=https%3A//github.com/onvif/specs/)
|
||
|
||
然后根据服务在对应语言库中搜索接口即可,一般来说各个语言都有onvif的实现库,比较常用c/c++、python、java、go等语言都有相关库或者框架。
|
||
|
||
这里也可用利用Onvif Device Test Tool工具来进行测试,内付onvif中文文档,Onvif Server Test Tool,有需要的同学自取 。
|
||
|
||
**链接: [https://pan.baidu.com/s/13t8iZLyUJ9kWQZqsh3mh6g?pwd=cxjj](https://link.zhihu.com/?target=https%3A//pan.baidu.com/s/13t8iZLyUJ9kWQZqsh3mh6g%3Fpwd%3Dcxjj)**
|
||
|
||
**提取码: cxjj**
|
||
|
||
## 四、ONVIF 能力集
|
||
|
||
### 4.1.1总览
|
||
|
||
ONVIF设备管理标准分为如下子标准,其中前5个是ONVIF设备必须实现的,后面2个是可选操作
|
||
|
||
| Capabilities | ONVIF设备能力集相关API |
|
||
| --------------------- | --------------- |
|
||
| Network | 网络相关API |
|
||
| System | 系统配置相关API |
|
||
| Security | 安全相关API |
|
||
| Input/Output(I/O) | |
|
||
| Auxiliary operation | |
|
||
| Storage Configuration | |
|
||
|
||
### 4.1.2 能力集交互过程
|
||
|
||
* **tds:Getcapabilities**
|
||
|
||
客户端请求报文:
|
||
|
||
|
||
```text
|
||
<?xml version="1.0" encoding="UTF-8"?>
|
||
<SOAP-ENV:Envelope xmlns:SOAP-ENV="http://www.w3.org/2003/05/soap-envelope"
|
||
xmlns:tds="http://www.onvif.org/ver10/device/wsdl">
|
||
<SOAP-ENV:Body>
|
||
<tds:GetCapabilities>
|
||
<tds:Category>All</tds:Category>
|
||
</tds:GetCapabilities>
|
||
</SOAP-ENV:Body>
|
||
</SOAP-ENV:Envelope>
|
||
```
|
||
|
||
|
||
服务器回复报文:
|
||
|
||
|
||
```text
|
||
<?xml version="1.0" encoding="UTF-8"?>
|
||
<SOAP-ENV:Envelope xmlns:SOAP-ENV="http://www.w3.org/2003/05/soap-envelope"
|
||
xmlns:tt="http://www.onvif.org/ver10/schema"
|
||
xmlns:tds="http://www.onvif.org/ver10/device/wsdl">
|
||
<SOAP-ENV:Body>
|
||
<tds:GetCapabilitiesResponse>
|
||
<tds:Capabilities>
|
||
<tt:Device>
|
||
<tt:XAddr>http://169.254.76.145/onvif/services</tt:XAddr>
|
||
<tt:Network>
|
||
<tt:IPFilter>true</tt:IPFilter>
|
||
<tt:ZeroConfiguration>true</tt:ZeroConfiguration>
|
||
<tt:IPVersion6>true</tt:IPVersion6>
|
||
<tt:DynDNS>true</tt:DynDNS>
|
||
</tt:Network>
|
||
<tt:System>
|
||
<tt:DiscoveryResolve>true</tt:DiscoveryResolve>
|
||
<tt:DiscoveryBye>true</tt:DiscoveryBye>
|
||
<tt:RemoteDiscovery>false</tt:RemoteDiscovery>
|
||
<tt:SystemBackup>false</tt:SystemBackup>
|
||
<tt:SystemLogging>true</tt:SystemLogging>
|
||
<tt:FirmwareUpgrade>false</tt:FirmwareUpgrade>
|
||
<tt:SupportedVersions>
|
||
<tt:Major>1</tt:Major>
|
||
<tt:Minor>0</tt:Minor>
|
||
</tt:SupportedVersions>
|
||
</tt:System>
|
||
<tt:IO>
|
||
<tt:InputConnectors>1</tt:InputConnectors>
|
||
<tt:RelayOutputs>0</tt:RelayOutputs>
|
||
</tt:IO>
|
||
<tt:Security>
|
||
<tt:TLS1.1>false</tt:TLS1.1>
|
||
<tt:TLS1.2>false</tt:TLS1.2>
|
||
<tt:OnboardKeyGeneration>false</tt:OnboardKeyGeneration>
|
||
<tt:AccessPolicyConfig>false</tt:AccessPolicyConfig>
|
||
<tt:X.509Token>false</tt:X.509Token>
|
||
<tt:SAMLToken>false</tt:SAMLToken>
|
||
<tt:KerberosToken>false</tt:KerberosToken>
|
||
<tt:RELToken>false</tt:RELToken>
|
||
</tt:Security>
|
||
</tt:Device>
|
||
<tt:Events>
|
||
<tt:XAddr>http://169.254.76.145/onvif/services</tt:XAddr>
|
||
<tt:WSSubscriptionPolicySupport>false</tt:WSSubscriptionPolicySupport>
|
||
<tt:WSPullPointSupport>false</tt:WSPullPointSupport>
|
||
<tt:WSPausableSubscriptionManagerInterfaceSupport>false</tt:WSPausableSubscriptionManagerInterfaceSupport>
|
||
</tt:Events>
|
||
<tt:Media>
|
||
<tt:XAddr>http://169.254.76.145/onvif/services</tt:XAddr>
|
||
<tt:StreamingCapabilities>
|
||
<tt:RTPMulticast>true</tt:RTPMulticast>
|
||
<tt:RTP_TCP>true</tt:RTP_TCP>
|
||
<tt:RTP_RTSP_TCP>true</tt:RTP_RTSP_TCP>
|
||
</tt:StreamingCapabilities>
|
||
</tt:Media>
|
||
</tds:Capabilities>
|
||
</tds:GetCapabilitiesResponse>
|
||
</SOAP-ENV:Body>
|
||
</SOAP-ENV:Envelope>
|
||
```
|
||
|
||
|
||
* **tev:GetServiceCapabilities**
|
||
客户端请求报文:
|
||
|
||
|
||
```text
|
||
POST /onvif/device_service HTTP/1.1
|
||
Host: 192.16.11.180
|
||
User-Agent: gSOAP/2.8
|
||
Content-Type: application/soap+xml; charset=utf-8; action="http://www.onvif.org/ver10/events/wsdl/EventPortType/GetServiceCapabilitiesRequest"
|
||
Content-Length: 2589
|
||
Connection: close
|
||
SOAPAction: "http://www.onvif.org/ver10/events/wsdl/EventPortType/GetServiceCapabilitiesRequest"
|
||
|
||
<?xml version="1.0" encoding="UTF-8"?>
|
||
<SOAP-ENV:Envelope xmlns:SOAP-ENV="http://www.w3.org/2003/05/soap-envelope" xmlns:SOAP-ENC="http://www.w3.org/2003/05/soap-encoding" xmlns:xsi="http://www.w3.org/2001/XMLSchema-instance" xmlns:xsd="http://www.w3.org/2001/XMLSchema" xmlns:wsa5="http://www.w3.org/2005/08/addressing" xmlns:wsa="http://www.w3.org/2005/08/addressing" xmlns:wsdd="http://schemas.xmlsoap.org/ws/2005/04/discovery" xmlns:chan="http://schemas.microsoft.com/ws/2005/02/duplex" xmlns:c14n="http://www.w3.org/2001/10/xml-exc-c14n#" xmlns:ds="http://www.w3.org/2000/09/xmldsig#" xmlns:saml1="urn:oasis:names:tc:SAML:1.0:assertion" xmlns:saml2="urn:oasis:names:tc:SAML:2.0:assertion" xmlns:wsu="http://docs.oasis-open.org/wss/2004/01/oasis-200401-wss-wssecurity-utility-1.0.xsd" xmlns:xenc="http://www.w3.org/2001/04/xmlenc#" xmlns:wsc="http://docs.oasis-open.org/ws-sx/ws-secureconversation/200512" xmlns:wsse="http://docs.oasis-open.org/wss/2004/01/oasis-200401-wss-wssecurity-secext-1.0.xsd" xmlns:xmime="http://tempuri.org/xmime.xsd" xmlns:xop="http://www.w3.org/2004/08/xop/include" xmlns:wsnt="http://docs.oasis-open.org/wsn/b-2" xmlns:tt="http://www.onvif.org/ver10/schema" xmlns:tns1="http://www.onvif.org/ver10/topics" xmlns:wsrfbf="http://docs.oasis-open.org/wsrf/bf-2" xmlns:wstop="http://docs.oasis-open.org/wsn/t-1" xmlns:wsrfr="http://docs.oasis-open.org/wsrf/r-2" xmlns:dn="http://www.onvif.org/ver10/network/wsdl" xmlns:tan="http://www.onvif.org/ver20/analytics/wsdl" xmlns:tds="http://www.onvif.org/ver10/device/wsdl" xmlns:tev="http://www.onvif.org/ver10/events/wsdl" xmlns:timg="http://www.onvif.org/ver20/imaging/wsdl" xmlns:tmd="http://www.onvif.org/ver10/deviceIO/wsdl" xmlns:tptz="http://www.onvif.org/ver20/ptz/wsdl" xmlns:tr2="http://www.onvif.org/ver20/media/wsdl" xmlns:trc="http://www.onvif.org/ver10/recording/wsdl" xmlns:trp="http://www.onvif.org/ver10/replay/wsdl" xmlns:trt="http://www.onvif.org/ver10/media/wsdl" xmlns:tse="http://www.onvif.org/ver10/search/wsdl">
|
||
<SOAP-ENV:Header>
|
||
<wsa:MessageID>urn:uuid:432d9097-6c1d-4a60-81d9-0b27d815ba6a</wsa:MessageID>
|
||
<wsa:ReplyTo SOAP-ENV:mustUnderstand="true">
|
||
<wsa:Address>http://www.w3.org/2005/08/addressing/anonymous</wsa:Address>
|
||
</wsa:ReplyTo>
|
||
<wsa:To SOAP-ENV:mustUnderstand="true">
|
||
http://172.16.11.180:80/onvif/device_service
|
||
</wsa:To>
|
||
<wsa:Action SOAP-ENV:mustUnderstand="true">
|
||
http://www.onvif.org/ver10/events/wsdl/EventPortType/GetServiceCapabilitiesRequest
|
||
</wsa:Action>
|
||
</SOAP-ENV:Header>
|
||
<SOAP-ENV:Body>
|
||
<tev:GetServiceCapabilities></tev:GetServiceCapabilities>
|
||
</SOAP-ENV:Body>
|
||
</SOAP-ENV:Envelope>
|
||
```
|
||
|
||
|
||
服务器回复报文:
|
||
|
||
|
||
```text
|
||
HTTP/1.1 200 OK
|
||
Content-Type: application/soap+xml; charset=utf-8
|
||
Content-Length: 827
|
||
Connection: close
|
||
|
||
<?xml version="1.0" encoding="UTF-8"?>
|
||
<SOAP-ENV:Envelope xmlns:SOAP-ENV="http://www.w3.org/2003/05/soap-envelope" xmlns:SOAP-ENC="http://www.w3.org/2003/05/soap-encoding" xmlns:tev="http://www.onvif.org/ver10/events/wsdl" xmlns:wsa5="http://www.w3.org/2005/08/addressing">
|
||
<SOAP-ENV:Header>
|
||
<wsa5:Action>http://www.onvif.org/ver10/events/wsdl/EventPortType/GetServiceCapabilitiesResponse</wsa5:Action>
|
||
</SOAP-ENV:Header>
|
||
<SOAP-ENV:Body>
|
||
<tev:GetServiceCapabilitiesResponse>
|
||
<tev:Capabilities
|
||
WSSubscriptionPolicySupport="false"
|
||
WSPullPointSupport="true"
|
||
WSPausableSubscriptionManagerInterfaceSupport="false"
|
||
MaxNotificationProducers="0"
|
||
MaxPullPoints="10"
|
||
PersistentNotificationStorage="false" />
|
||
</tev:GetServiceCapabilitiesResponse>
|
||
</SOAP-ENV:Body>
|
||
</SOAP-ENV:Envelope>
|
||
```
|
||
|
||
|
||
详细可查阅主页文章:[https://blog.csdn.net/weixin\_37](https://link.zhihu.com/?target=https%3A//blog.csdn.net/weixin%5F37926485/category%5F11550122.html)
|
||
|
||
### 4.2 Capabilities API
|
||
|
||
### 4.2.1 wsdl获取API
|
||
|
||
**GetWsdlUrl** \# 获取设计wsdl, API不开放权限给用户
|
||
|
||
### 4.2.2Capabilities exchange API
|
||
|
||
一系列获取设备能力的API
|
||
|
||
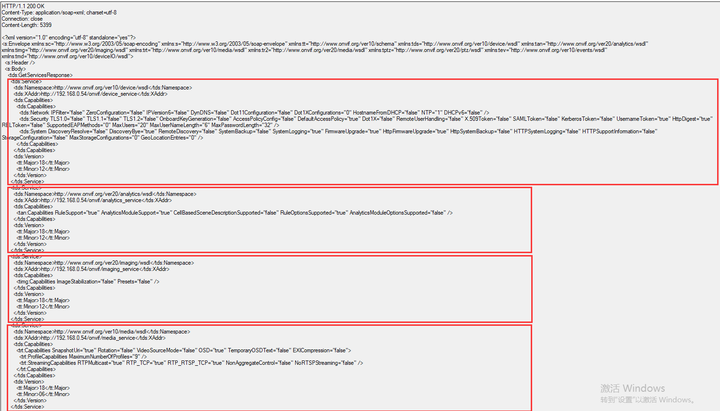
**GetServices** 获取dev支持的服务,可附加服务能力集+设备能力集
|
||
|
||
| GetServices -> GetServiceCapabilities \-> GetCapabilities |
|
||
| --------------------------------------------------------- |
|
||
|
||
例子:如下报文描述了设备若干能力集,可以包括tds作用域下的能力也包括其他作用域能力集
|
||
|
||
|
||
|
||
**GetServiceCapabilities** 获取网络服务能力集,注:必须实现,若实现GetServices
|
||
|
||
注:ONVIF网络服务能力集分类如下:
|
||
|
||
| Capabilities | remark |
|
||
| -------------------- | ------ |
|
||
| NetworkCapabilities | 网络能力 |
|
||
| SecurityCapabilities | 安全能力 |
|
||
| SystemCapabilities | 系统能力 |
|
||
| MiscCapabilities | 其他能力 |
|
||
|
||
**GetCapabilities** 获取设备能力集,注:必须实现,若实现GetServices
|
||
|
||
注:ONVIF能力分类如下:
|
||
|
||
| Service | remark |
|
||
| --------- | ------- |
|
||
| Analytics | 视频分析 |
|
||
| Device | 设备 |
|
||
| Events | 事件处理 |
|
||
| Imaging | 图像设置 |
|
||
| Media | 媒体设置 |
|
||
| PTZ | 摄像头云台控制 |
|
||
|
||
## 五、API
|
||
|
||
### 5.1 Network API
|
||
|
||
|
||
```xml
|
||
GetHostname #返回主机域名,注:域名可以是从DHCP获取的
|
||
|
||
SetHostname #设置主机域名,注:主机域名可以从DHCP获取,若设备具有HostnameFromDHCP能力,此时只需要提交空的 Name 字段
|
||
|
||
SetHostnameFromDHCP #设置设备是否从DHCP获取域名功能
|
||
GetDNS #获取DNS设置,获取包括DHCP开关、搜索域(不明)、DHCP获取的DNS服务IP列表(要求DHCP开关必须开启)、手动DNS服务IP列表
|
||
|
||
SetDNS #设置DNS,包括开启DHCP开关、设置搜索域、手动设置DNS服务。错误码(忽略常规错误码):sender(指收到错误码的位请求发送方)-无效参数-IP地址无效(应该是指手动配置的DNS服务IP无效)
|
||
GetNTP #获取NTP(网络时间协议) 配置,获取包括NTP服务IP的DHCP开关、DHCP NTP IP列表、手动NTP IP列表
|
||
|
||
SetNTP #配置NTP,包括DHCP开关、手动NTP服务IP列表,错误码:sender-无效参数-设备的当前时间格式要求配置NTP服务
|
||
|
||
GetDynamicDNS #获取动态DNS配置(要求Dev支持DynDNS能力),包括更新规则、DNS名(当DNS主动更新)、DNS保活时间(当DNS主动更新,原理类似UDP P2P保活)
|
||
|
||
SetDynamicDNS #设置上述属性,要求设备支持 [RFC 2136] and [RFC 4702]标准,即DynDNS能力
|
||
|
||
GetNetworkInterfaces #获取API属性(比如API是否启用、连接设置、MTU分包策略、IPv4/IPv6设置)列表,参考:tt:NetworkInterfaceInfo
|
||
|
||
SetNetworkInterfaces #配置设备支持的API属性,配置成功后,如果返回属性RebootNeeded为true,则表明配置需要重启设备后生效(比如IP地址),这时候需要向设备发送SystemReboot请求;若属性为false,则表明配置立即生效。
|
||
|
||
GetNetworkProtocols #获取应用层网络协议(ONVIF18.12支持HTTP\HTTPS\RTP)
|
||
|
||
SetNetworkProtocols #配置应用层协议,与上述协议成对
|
||
|
||
GetNetworkDefaultGateway #返回手动配置的默认网关IP
|
||
|
||
SetNetworkDefaultGateway #设置默认网关
|
||
|
||
GetZeroConfiguration #从设备获取zero-configuration(设备自动配置)相关参数,设备如果支持RFC3927标准,请求返回 IPv4 zero configuration address 和 status(应该指 InterfaceToken 字段)
|
||
|
||
SetZeroConfiguration #配置设备zero-configuration相关参数,要求设备支持RFC3927标准,且支持ZeroConfiguration 能力
|
||
|
||
GetIPAddressFilter #获取设备IP过滤规则(要求设置支持 IPFilter 能力)
|
||
|
||
AddIPAddressFilter #增加设备IP过滤规则,禁止那些IP访问、允许那些IP访问
|
||
|
||
RemoveIPAddressFilter #删除设备IP过滤规则IEEE 802.11 configuration #IEEE 802.11系列配置项(要求设备支持IEEE 802.11标准(wifi)具有Dot11Configuration 能力)
|
||
参考:[IEEE 802.11]简介:https://blog.csdn.net/f2157120/article/details/80831211
|
||
ONVIF要求能够对设备进行如下配置:(具体方式ONVIF不做限制)
|
||
SSID
|
||
Station mode
|
||
Multiple wireless network configuration
|
||
Security configuration
|
||
|
||
GetDot11Capabilities #获取设备支持的Dot11能力,IEEE 802.11定义了TKIP、ScanAvailableNetworks 、MultipleConfiguration 、AdHocStationMode 、WEP 5种能力
|
||
|
||
GetDot11Status #获取无线网状态
|
||
|
||
ScanAvailableDot11Networks #扫描可用Dot11局域网,就是手机wifi网络扫描功能
|
||
```
|
||
|
||
|
||
### 5.2 System API
|
||
|
||
|
||
```text
|
||
GetDeviceInformation #获取设备的制造商、软件模型、固件版本、序列号、硬件id
|
||
|
||
GetSystemUris #获取从Dev提取日志、诊断信息、系统备份信息的url
|
||
|
||
GetSystemBackup #从Dev获取系统备份(要求Dev具备SystemBackup能力,API已被弃用,替代API参考GetSystemUris 和 StartSystemRestore)系统备份可以用于回复设备的配置,注恢复设备的IP配置可能不同。系统备份文件的传输协议 为[MTOM]
|
||
|
||
RestoreSystem #恢复系统备份(要求Dev具备SystemBackup能力,API已被弃用,替代API参考GetSystemUris 和 StartSystemRestore)系统备份文件的传输协议 为[MTOM]
|
||
|
||
StartSystemRestore #恢复系统备份,Dev返回上传备份数据的URL及上传有效时间(避免客户端恶意占用上传网络资源)上传并恢复备份步骤
|
||
|
||
GetSystemDateAndTime #获取系统时间,会表明时间来自手动设置或NTP(此时要求SetNTP、GetNTP有效)、夏至时开关、时区、UTC时间、Dev本地时间。注:虽然UTC时间格式为可选但是为了向后兼容,设备shall提供UTC时间。
|
||
|
||
SetSystemDateAndTime #设置系统时间,GetSystemDateAndTime成对
|
||
|
||
SetSystemFactoryDefault #恢复出厂设置,设备必须支持软、硬件初上设置。注:ONVIF对软件出厂设置未做定义,要是要求设备软出厂恢复后之前的IP仍能可达。这表明软出厂恢复时要求网络设置:IP地址、子网及网关设置、DHCP设置被保持。防止操作后设备丢失!
|
||
|
||
UpgradeSystemFirmware #固件升级(API已遗弃),升级包通过MTOM协议传输,同样要求网络设置:IP地址、子网及网关设置、DHCP设置被保持
|
||
|
||
StartFirmwareUpgrade #固件升级,具体的固件数据格式ONVIF不做定义,若上传的固件数据无效,Dev返回Http状态码"415 Unsupported Media Type",若升级失败适应为Dev故障则返回Http状态码"500 Internal Server Error"。POST数据时,Content-Type字段要求"application/octet stream"。同样要求升级后网络配置不变。上传文件及升级操作步骤
|
||
|
||
GetSystemLog #获取日志(可选系统日志、客户端访问日志),传输遵守[MTOM],具体日志格式ONVIF不做规定。获取日志的url从GetSystemUris 取得
|
||
|
||
GetSystemSupportInformation #获取系统诊断信息,设备可选传回二进制数据或文本数据,传输遵守[MTOM],具体日志格式ONVIF不做规定。获取日志的url从GetSystemUris 取得
|
||
|
||
SystemReboot #设备重启
|
||
|
||
GetScopes #获取scope相关参数(scope用于匹配设备发现probe message),返回固定scope和可配置scope
|
||
|
||
SetScopes #重置可配scope,注:会覆盖现有的所有可配scope!,支持多个scope,用列表下标作为索引号
|
||
|
||
AddScopes #为已有可配scope增加scope url参数,用列表下标作为scope索引
|
||
|
||
RemoveScopes #为已有可配scope删除scope url参数,用列表下标作为scope索引
|
||
|
||
GetDiscoveryMode #获取设备发现模式(可发现、不可发现)
|
||
|
||
SetDiscoveryMode #设置设备发现模式
|
||
|
||
GetGeoLocation #获取地理信息,(要求设备支持 GeoLocationEntities 能力,若设备支持AutoGeo能力AutoGeo条目有效)地理信息条目包括(设备不一定要支持全部地理信息条目)
|
||
|
||
|
||
SetGeoLocation #改变地理信息条目配置,成功设置后,会影响GetGeoLocation 返回信息
|
||
|
||
DeleteGeoLocation #删除地理信息条目,删除后GetGeoLocation 不再显示
|
||
```
|
||
|
||
|
||
### 5.3 Security API
|
||
|
||
|
||
```text
|
||
GetAccessPolicy #获取设备访问规则(二进制数据),包括用户级别、服务访问权限信息,若设备支持 SetAccessPolicy ,则必须实现本API。
|
||
|
||
SetAccessPolicy #设置访问规则
|
||
|
||
GetUsers #获取用户信息列表(不包含证据或密码)
|
||
|
||
CreateUsers #新建用户,需要输入用户名、密码、用户级别
|
||
|
||
DeleteUsers #删除用户,根据用户名
|
||
|
||
SetUser #改变用户设置,(用户名不能变,密码、级别可以变),重置密码时如果密码太简单设备返回ter:PasswordTooWeak错误码
|
||
|
||
GetRemoteUser #获取远程用户(远程用户是什么用户?和普通用户有什么区别?)列表,(要求设备支持RemoteUserHandling 能力)
|
||
|
||
SetRemoteUser #设置远程用户(The user is only valid for the WS-UserToken profile or as a HTTP / RTSP user)
|
||
|
||
GetEndpointReference #获取设备服务端引用属性(服务的GUID),从文档中描述看,这个GUID可以用于计算远程用户操作的密码。
|
||
```
|
||
|
||
|
||
### 5.4 I/O API
|
||
|
||
本节I/O相关的接口,主要用于保证后端兼容性。控制、获取IO端口的状态。更广泛的IO接口参考ONVIF Device IO Specification。
|
||
|
||
|
||
```text
|
||
GetRelayOutputs #获取可用relay(什么是relay输出?可能是类似NVR通道的概念)输出列表
|
||
|
||
SetRelayOutputSettings #设置relay输出
|
||
```
|
||
|
||
|
||
### 5.5 辅助外设
|
||
|
||
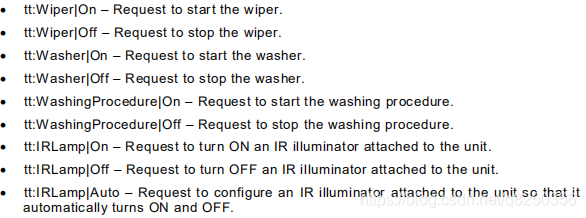
**SendAuxiliaryCommand** 发送设备辅助外设控制指令,比如控制红外线照明灯、加热器、雨刮器、温度计等
|
||
|
||
请求报文类型tt:AuxiliaryData实际是一个xsd字符串,onvif不规定指令的风格,但必须复合格式"tt:command|parameter",如:
|
||
|
||
|
||
|
||
### 5.6 存储配置
|
||
|
||
以下接口允许客户端对设备数据存储进行设置,可以参考 DAS, NAS, 和CDMI Server的存储配置。要求设备具有Storage Configuration能力
|
||
|
||
|
||
```text
|
||
GetStorageConfigurations #获取所有存储配置项(不太明白这个存储配置指什么?)
|
||
|
||
CreateStorageConfiguration #新建存储配置
|
||
|
||
GetStorageConfiguration #通过tt:ReferenceTokentt:ReferenceToken获取存储配置
|
||
|
||
SetStorageConfiguration #重置已有的配置
|
||
|
||
DeleteStorageConfiguration #删除配置
|
||
```
|
||
|
||
|
||
### 5.7 设备监控事件
|
||
|
||
设备主动上报运行状态的事件
|
||
|
||
|
||
```text
|
||
tns1:Monitoring/ProcessorUsage // 上报设备处理器实时信息,Source应该是用来描述Data是什么
|
||
|
||
tns1:Monitoring/LinkStatus //上报设备的连接状态
|
||
|
||
tns1:Monitoring/UploadStatus // 当设备正在升级固件或系统时,上报升级状态,进度 注:设备上报时时间格式复合UTC的格林尼治标准
|
||
|
||
tns1:Monitoring/OperatingTime/DefinedLimitReached // 到达操作时限时上报
|
||
|
||
tns1:Monitoring/OperatingTime/MeanTimeBetweenFailuresDefaultLimitReached //MTBF(平均故障间隔时间)时限时上报,设备故障状态,用于计算设备无故障运行时间
|
||
|
||
tns1:Monitoring/OperatingTime/MeanTimeBetweenFailuresOperationLimitReached //MTBF 操作时限时上报
|
||
|
||
tns1:Monitoring/OperatingTime/LastReset //恢复出厂前上报
|
||
|
||
tns1:Monitoring/OperatingTime/LastReboot //reboot前上报
|
||
|
||
tns1:Monitoring/OperatingTime/LastClockSynchronization //时钟同步后上报,由 NTP message或SetSystemDateAndTime call引发
|
||
|
||
tns1:Monitoring/Maintenance/Last //设备上报最后保持激活状态的时间(设备之后应该是休眠)
|
||
|
||
tns1:Monitoring/Maintenance/NextScheduled //上报下次激活的时间
|
||
|
||
tns1:Monitoring/Backup/Last //设备恢复备份后上报
|
||
|
||
tns1:Monitoring/AreaOfOperation/OutsideCertifiedArea //当设备被认证为不因为外界原因而松动时上报(没明白啥意思)
|
||
|
||
tns1:Monitoring/AreaOfOperation/OutsideConfiguredArea //当设备被配置为不因为外界原因而松动时上报
|
||
|
||
tns1:Monitoring/EnvironmentalConditions/RelativeHumidity //上报湿度信息,要求设备支持环境监测能力
|
||
|
||
tns1:Monitoring/EnvironmentalConditions/Temperature //上报温度信息,上报策略可以是6s/次或温差大于5%时,防止引发“事件洪水”
|
||
|
||
tns1:Monitoring/BatteryCapacity //上报剩余电池量,recommended to use a 2% change
|
||
|
||
tns1:Monitoring/AsynchronousOperationStatus //上报异步操作的进度。Token 字段用标识异步操作,区分同一类型一步操作的不同会话; OperationName 操作名; ServiceName 异步操作的服务名;OperationName 和ServiceName 可用于区别不同的异步操作; Progress 字段展示操作执行进度[0.0, 1.0]; Error 字段展示操作错误,错误码标准要求符合soapenv:Fault
|
||
|
||
tns1:Device/OperationMode/ShutdownInitiated //关机前发送
|
||
|
||
tns1:Device/OperationMode/UploadInitiated //升级开始前发送
|
||
|
||
tns1:Monitoring/Washer/LiquidLow //上报水箱液体等级
|
||
|
||
tns1:Device/HardwareFailure/FanFailure //散热风扇故障
|
||
|
||
tns1:Device/HardwareFailure/PowerSupplyFailure //供电故障
|
||
|
||
tns1:Device/HardwareFailure/StorageFailure //存储设备故障
|
||
|
||
tns1:Device/HardwareFailure/TemperatureCritical //设备温度过载报警
|
||
|
||
tns1:Monitoring/GeoLocation //上报地理位置(针对便携式设备)
|
||
```
|
||
|
||
|
||
### 5.8事件通知
|
||
|
||
"设备事件"是设备的主动活动或者检测到有事发生时产生,当客户端定于某种类型的事件后,当事件产生时设备以某种形式推送消息给客户端。事件的处理,在\[WS-BaseNotification\]和\[WS-Topics\] 规范基础上扩展
|
||
|
||
事件订阅/通知方式:10.1 Pull-Point Notification(拉模式通知)
|
||
|
||
### 5.8.1 Pull-Point Notification(拉模式通知)
|
||
|
||
从时序图可以看出,事件通知并不是设备主动上报而是需要客户端发送PullMessages拉取。这种方式无需在客户端和设备间维护链路,但要求客户端能够主动连接设备,当设备IP不固定的时候(比如Iot场景下),拉模式通知往往需要在设备主动建立交互之后才能进行,这导致这种场景下通知不够实时.
|
||
|
||
详细可查看:[ONVIF专题--Onvif标准解读(3)--Core Spec::Device Management(1)](https://link.zhihu.com/?target=https%3A//blog.csdn.net/q8250356/article/details/102982071)
|
||
|
||
1、client通过CreatePullPointSubscriptionRequest向device申请PullPointSubscription(拉订阅点)。这个request包含了此订阅的详细描述信息。并且与the Basic Notification Interface不同之处就是此处需要省略consumerReference。
|
||
|
||
2、当subscribe被接受的时候device评估此订阅后返回CreatePullPointSubscriptionResponse 或者返回一个错误代码。
|
||
|
||
3、订阅被接受后,反馈的response需要包含SubscriptionManager的WS-EndpointReference. WS-Endpoint必须提供PullMessage操作,Pullmessage用于客户端检索通知信息,以及由订阅管理manager接口去描述WS-BaseeNotification。Base Subscription Manager 接口包含PullMessage,Renew,Unsubscribe 等操作。交互序列如上图。PullMessage包含Timeout以及MessageLimit 参数
|
||
|
||
4、一旦有来自client的查询通知则device必须立即响应,如果没有则device一直保持等待client所订阅的通知到来或者等待超时发生。一般情况下至少包括response,且通知个数是被指定的。client在发出的一个PullMessagesRequest并收到PullMessagesResponse后既可以实时轮询通知接口(类似于一问一答式的服务)
|
||
|
||
5、如果在CreatePullPointSubscriptionRequest中未指定结束或者相关结束时间,则每个PullMessagesRequest理解为保持激活状态等待相应的PullPointSubscription.并且结束时间会根据相关联的结束时间或者装置内置数值进行再计算。为了通知client去更新结束时PullMessageResponse必须包含CurrentTime以及terminalTime选项。当PullMessagesRequest处于激活状态并等待相应的PullPointSubscription,此时由WS-BaseNotification定义的RenewRequest不能被Client,因此device需要支持PullPointSubscription。(在没有订阅的前提下发送PullMessagesRequest,需要等待PullPointSubscription去创建订阅完成才能继续运行)
|
||
|
||
6、如果device支持通知持续保存,则WS-Endpoint必须支持Seek操作,其支持将pull指针重新拉回原位置。为防止将指针的放置位置超出了buffer的起始位置,第一次调用PullMessage要从buffer的起始位置开始。(9.12.9)SeekRequest包含了UtcTime参数,UtcTime参数必须NotificationMessage中的属性相匹配。当使用seek,则pull指针要放置在包含NotificationMessage的且其UtcTime少于等于seek参数的buffer中。SeekRequest包含一个可选的对立参数,这个参数可以将PullMessageResquest的pull方向反向。
|
||
|
||
接口:
|
||
|
||
|
||
```text
|
||
CreatePullPointSubscription //创建订阅,请求中可以指定要订阅的事件类型,订阅持续事件
|
||
|
||
PullMessages //拉取事件
|
||
|
||
Renew //要求设备支持MaxNotificationProducers能力,可能是重置订阅,具体用法不清楚
|
||
|
||
Unsubscribe //取消所有订阅
|
||
|
||
Seek //如果设备支持时间存储,则应该支持事件检索
|
||
```
|
||
|
||
|
||
## 5.8.2 Basic Notification(WS-BaseNotification通知)
|
||
|
||
从时序图即可看出,这种消息通知方式,是设备主动的,要求设备能够主动连接设备。或者TCP长连接,或者通过UDP链路保活,或者client IP固定。
|
||
|
||
从时序图即可看出,这种消息通知方式,是设备主动的,要求设备能够主动连接设备。或者TCP长连接,或者通过UDP链路保活,或者client IP固定。
|
||
|
||
## 六、ONVIF Device Test Tool 检测工具
|
||
|
||
### 6.1 ONVIF Device Test Tool
|
||
|
||
ONVIF Device Test Tool是官方发布的onvif检测工具,该工具只提供给ONVIF会员使用,官网不提供下载,需要的同学可自取:链接: [https://pan.baidu.com/s/13t8iZLyUJ9kWQZqsh3mh6g?pwd=cxjj](https://link.zhihu.com/?target=https%3A//pan.baidu.com/s/13t8iZLyUJ9kWQZqsh3mh6g%3Fpwd%3Dcxjj) 提取码: cxjj
|
||
|
||
### **6.1.1 基本使用方法**
|
||
|
||
这里只讲检测报像头支持哪些请求,更具体的可参考:[https://wenku.baidu.com/view/510b1105a58da0116d174906.html](https://link.zhihu.com/?target=https%3A//wenku.baidu.com/view/510b1105a58da0116d174906.html)
|
||
|
||
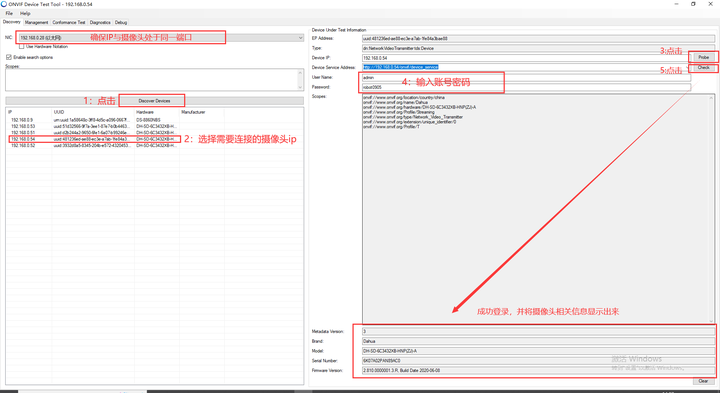
打开onvif device test tool之后:
|
||
|
||
第一步,下接选择要用以收发探测数据包的网卡
|
||
|
||
第二步,点击“Discover Devices”按钮检测局域网中的摄像头(本质是向发239.255.255.250:3702发送组播数据包,要求所有收到数据包的摄像头向本机3702端口进行回应)
|
||
|
||
第三步,检测完成后左下方就会呈现摄像头列表,双击要检测的摄像头,其信息就会自动填到右上方的相应内容框中
|
||
|
||
第四步,点击“Probe”探测选中主机是否真的支持onvif协议,如果没有弹框报错那就是支持的
|
||
|
||
第五步,在username和password域中填入web管理员的用户名密码,然后点击右方的“check”检测用户名密码是否有误。如果没有错误右下方的几个框将会呈现摄像头的一些信息。该处用户名密码是要输入的,因为其他选项卡的请求(如果要用到)会自动从该处读取用户名密码发往服务端进行操作鉴权。
|
||
|
||
|
||
|
||
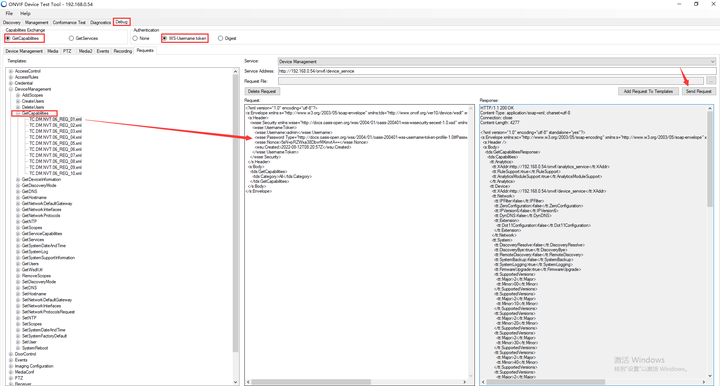
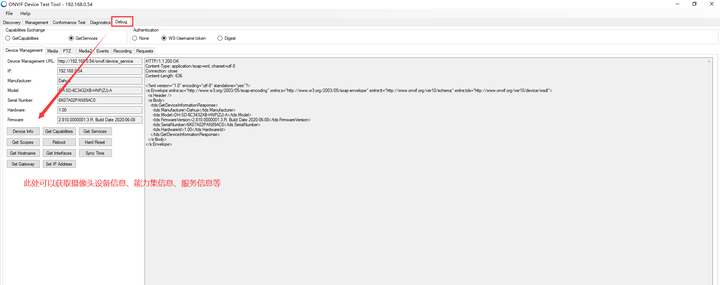
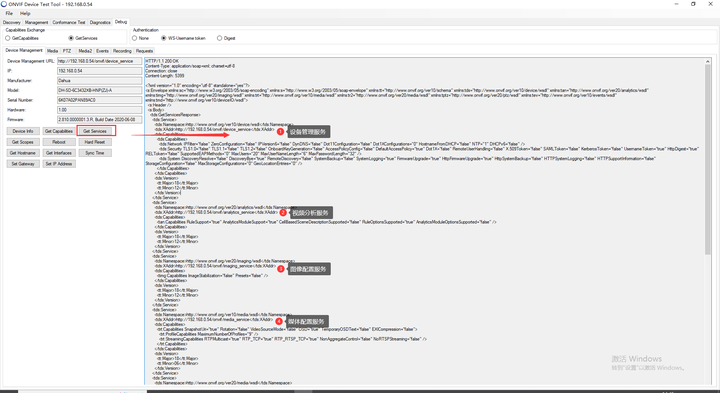
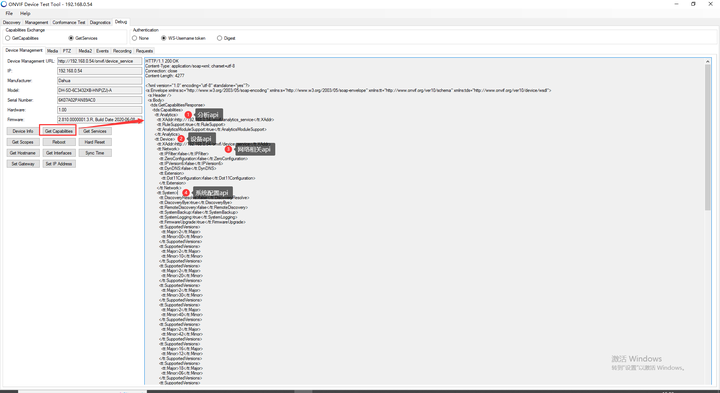
切换到Debug选项卡
|
||
|
||
第一步,将上面Discovery选项卡中,Device Service Address框的值复制到Debug选项卡的“Service Address”框中
|
||
|
||
第二步,在左下方“Templates”中双出选择要进行检测的请求
|
||
|
||
第三步,在左上方“Authentication”中选择权限验证方式(None为不发送用户名密码,WS-Username token是onvif标准的用户名密码验证方式,Digest是RTSP中的Digest形式,用户名密码就是从Discovery那里读过来的)
|
||
|
||
第四步,点击“Send Request”发送数据包,如果没有问题在“Response”框中就会呈现返回结果
|
||
|
||
|
||
|
||
以上操作基于我使用该工具的目的是:确认摄像头支持onvif、获取onvif请求报文以构造畸形报文测试摄像头对报文处理是否有问题。)
|
||
|
||
|
||
|
||
|
||
|
||
|
||
|
||
**6.2 ONVIF Device Manager**
|
||
|
||
ONVIF Device Manager是一个第三方的onvif协议测试工具,具有以下功能
|
||
|
||

|
||
|
||
下载链接:[https://sourceforge.net/projects/onvifdm/?source=navbar](https://link.zhihu.com/?target=https%3A//sourceforge.net/projects/onvifdm/%3Fsource%3Dnavbar) 也可以在上述6.1中下载。
|
||
|
||
### **6.2.1 基本使用方法**
|
||
|
||
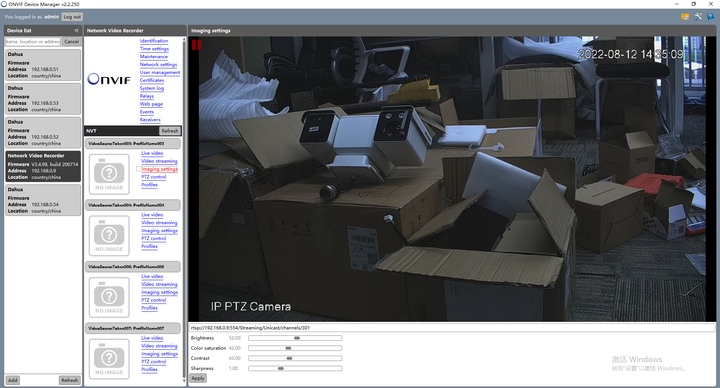
onvif device manager的感觉可以认为是onvif device test tool的简化版,简化的意思一是功能少了一些,二是功能少了同时操作起来更简单明了。更具体使用可参考:[https://wenku.baidu.com/view/3cb0bf1a3c1ec5da51e27002.html](https://link.zhihu.com/?target=https%3A//wenku.baidu.com/view/3cb0bf1a3c1ec5da51e27002.html)
|
||
|
||
第一步,打开onvif device manager,左侧是当前检测到的支持onvif的设备,可点击“Refresh”按钮刷新列表。实际使用发现不管怎么刷新该工具总是很难发现全部设备,此时可使用“Add”按钮手动添加。
|
||
|
||
第二步,双击自己要检测的设备,如果该设备真支持onvif那么在中部就会呈现支持的onvif操作。当前图中告警是因为用户名密码错误。
|
||
|
||
第三步,如果设备要求用户名密码那就在左上方的name和password框中分别输入摄像头web端的用户名密码,然后点击“Log in”。注意这里不管输什么都会“登录成功”,但真正发包时只有正确的用户名密码才能完成请求,所以一定要输入正确的web端用户名密码。
|
||
|
||
|
||
|
||
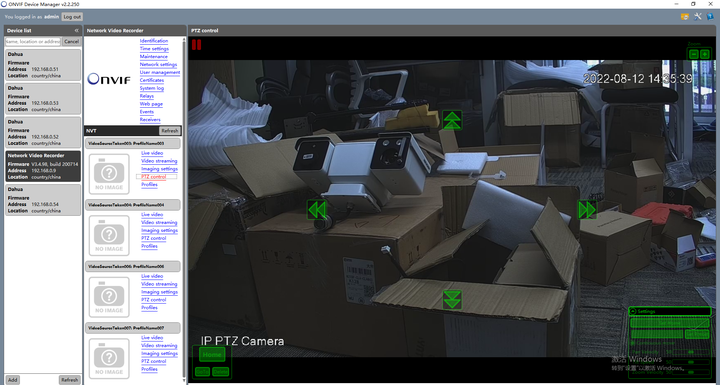
|
||
|
||
上面是用的海康摄像头,视频可以正常显示,但是用大华的摄像头不知道是不是兼容性导致不显示还是其他原因,这里贴图对比一下,两者均不影响调用onvif协议。
|
||
|
||
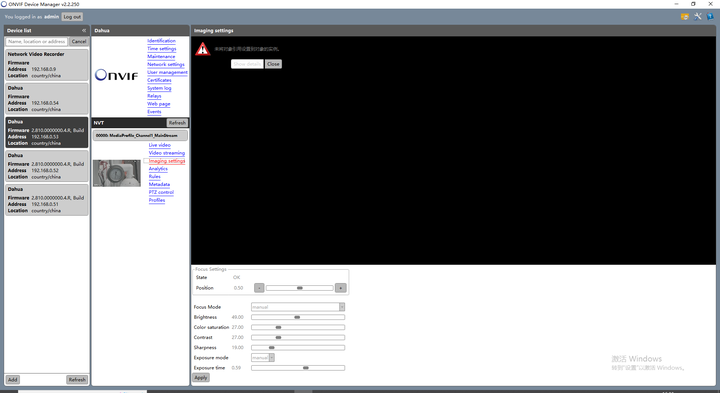
|
||
|
||
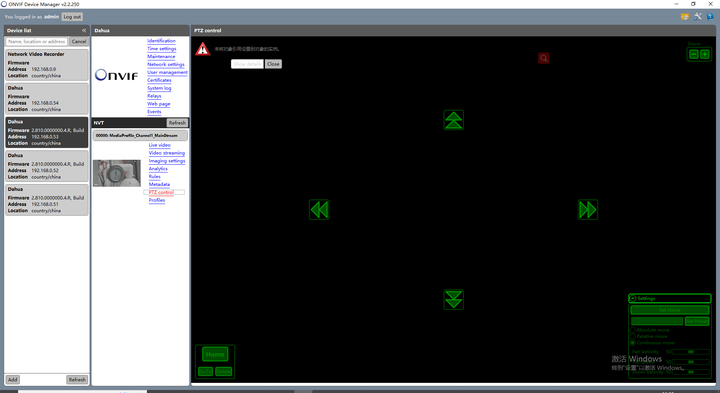
|
||
|
||
这里不知道请求体的同学可以下载一个Wireshark工具进行抓包,这里可以查阅借鉴一下[https://blog.csdn.net/weixin\_43](https://link.zhihu.com/?target=https%3A//blog.csdn.net/weixin%5F43360707/article/details/122984611)
|
||
|
||
## 七、代码案例
|
||
|
||
这里以设置摄像头亮度、曝光度为例,通过抓包以及检测工具可以抓到请求体为:
|
||
|
||
曝光/亮度请求体:
|
||
|
||
|
||
```text
|
||
<s:Envelope xmlns:s="http://www.w3.org/2003/05/soap-envelope">
|
||
<s:Header>
|
||
<Security s:mustUnderstand="1" xmlns="http://docs.oasis-open.org/wss/2004/01/oasis-200401-wss-wssecurity-secext-1.0.xsd">
|
||
<UsernameToken>
|
||
<Username>admin</Username>
|
||
<Password Type="http://docs.oasis-open.org/wss/2004/01/oasis-200401-wss-username-token-profile-1.0#PasswordDigest">{password}</Password>
|
||
<Nonce EncodingType="http://docs.oasis-open.org/wss/2004/01/oasis-200401-wss-soap-message-security-1.0#Base64Binary">{nonce}</Nonce>
|
||
<Created xmlns="http://docs.oasis-open.org/wss/2004/01/oasis-200401-wss-wssecurity-utility-1.0.xsd">{created}</Created>
|
||
</UsernameToken>
|
||
</Security>
|
||
</s:Header>
|
||
<s:Body xmlns:xsi="http://www.w3.org/2001/XMLSchema-instance" xmlns:xsd="http://www.w3.org/2001/XMLSchema">
|
||
<SetImagingSettings xmlns="http://www.onvif.org/ver20/imaging/wsdl">
|
||
<VideoSourceToken>{token}</VideoSourceToken>
|
||
<ImagingSettings>
|
||
<Brightness xmlns="http://www.onvif.org/ver10/schema">{brightness}</Brightness>
|
||
<Exposure xmlns="http://www.onvif.org/ver10/schema">
|
||
<Mode>MANUAL</Mode>
|
||
<Iris>{iris}</Iris>
|
||
</Exposure>
|
||
</ImagingSettings>
|
||
</SetImagingSettings>
|
||
</s:Body>
|
||
</s:Envelope>
|
||
```
|
||
|
||
|
||
获取token请求体:
|
||
|
||
|
||
```text
|
||
<soap:Envelope xmlns:soap="http://www.w3.org/2003/05/soap-envelope" xmlns:trt="http://www.onvif.org/ver10/media/wsdl" xmlns:tt="http://www.onvif.org/ver10/schema">
|
||
<s:Header xmlns:s="http://www.w3.org/2003/05/soap-envelope">
|
||
<wsse:Security xmlns:wsse="http://docs.oasis-open.org/wss/2004/01/oasis-200401-wss-wssecurity-secext-1.0.xsd" xmlns:wsu="http://docs.oasis-open.org/wss/2004/01/oasis-200401-wss-wssecurity-utility-1.0.xsd">
|
||
<wsse:UsernameToken>
|
||
<wsse:Username>{username}</wsse:Username>
|
||
<wsse:Password Type="http://docs.oasis-open.org/wss/2004/01/oasis-200401-wss-username-token-profile-1.0#PasswordDigest">{password}</wsse:Password>
|
||
<wsse:Nonce>{nonce}</wsse:Nonce>
|
||
<wsu:Created>{created}</wsu:Created>
|
||
</wsse:UsernameToken>
|
||
</wsse:Security>
|
||
</s:Header>
|
||
<soap:Body>
|
||
<trt:GetProfiles />
|
||
</soap:Body>
|
||
</soap:Envelope>
|
||
```
|
||
|
||
|
||
请求体中的{username}、{password}设置成自己需要连接的摄像头登录、密码,{nonce}为随机的32位随机数,{iris}为设置曝光度,{brightness}为亮度,如果不知道各个参数的取值范围可以调用Imaging中的GetImagingSettings接口,请求体为:
|
||
|
||
|
||
```text
|
||
<s:Envelope xmlns:s="http://www.w3.org/2003/05/soap-envelope">
|
||
<s:Header>
|
||
<Security s:mustUnderstand="1" xmlns="http://docs.oasis-open.org/wss/2004/01/oasis-200401-wss-wssecurity-secext-1.0.xsd">
|
||
<UsernameToken>
|
||
<Username>admin</Username>
|
||
<Password Type="http://docs.oasis-open.org/wss/2004/01/oasis-200401-wss-username-token-profile-1.0#PasswordDigest">{password}</Password>
|
||
<Nonce EncodingType="http://docs.oasis-open.org/wss/2004/01/oasis-200401-wss-soap-message-security-1.0#Base64Binary">{nonce}</Nonce>
|
||
<Created xmlns="http://docs.oasis-open.org/wss/2004/01/oasis-200401-wss-wssecurity-utility-1.0.xsd">{created}</Created>
|
||
</UsernameToken>
|
||
</Security>
|
||
</s:Header>
|
||
<s:Body xmlns:xsi="http://www.w3.org/2001/XMLSchema-instance" xmlns:xsd="http://www.w3.org/2001/XMLSchema">
|
||
<GetImagingSettings xmlns="http://www.onvif.org/ver20/imaging/wsdl">
|
||
<VideoSourceToken>{token}</VideoSourceToken>
|
||
</GetImagingSettings>
|
||
</s:Body>
|
||
</s:Envelope>
|
||
```
|
||
|
||
|
||
定义设置成功返回体:
|
||
|
||
|
||
```java
|
||
package com.xiaoma.guard.onvif.imaging;
|
||
|
||
import io.swagger.annotations.ApiModel;
|
||
import io.swagger.annotations.ApiModelProperty;
|
||
import org.dom4j.Element;
|
||
import org.dom4j.Node;
|
||
import org.dom4j.tree.DefaultElement;
|
||
|
||
import java.io.Serializable;
|
||
import java.util.List;
|
||
|
||
/**
|
||
* @ProjectName:server-assisted-guard-2.0
|
||
* @ClassName:ImagingDetai
|
||
* @Description:TODO 获取图像实时位置
|
||
* @Date:2022/8/10 1:56 下午
|
||
* @Author:z7-x
|
||
*/
|
||
@ApiModel(value = "图像位置信息", description = "图像位置信息")
|
||
public class ImagingDetail implements Serializable {
|
||
|
||
@ApiModelProperty("亮度,取值范围0~100,越趋向于0越暗")
|
||
private Double brightness = 0.0;
|
||
|
||
@ApiModelProperty("颜色饱和度,取值范围0~100")
|
||
private Double color_saturation = 0.0;
|
||
|
||
@ApiModelProperty("对比度,取值范围0~100")
|
||
private Double contrast = 0.0;
|
||
|
||
@ApiModelProperty("锐度,取值范围0~100")
|
||
private Double sharpness = 0.0;
|
||
|
||
@ApiModelProperty("曝光度,取值范围0~1,越趋向于0曝光越低")
|
||
private Double iris = 0.0;
|
||
|
||
public ImagingDetail(Element root) {
|
||
Element title = root.element("Body").element("GetImagingSettingsResponse").element("ImagingSettings");
|
||
List<Node> nodes = title.content();
|
||
for (Node node : nodes) {
|
||
switch (node.getName()) {
|
||
case "Brightness":
|
||
this.brightness = Double.parseDouble(node.getText());
|
||
break;
|
||
case "ColorSaturation":
|
||
this.color_saturation = Double.parseDouble(node.getText());
|
||
break;
|
||
case "Contrast":
|
||
this.contrast = Double.parseDouble(node.getText());
|
||
break;
|
||
case "Sharpness":
|
||
this.sharpness = Double.parseDouble(node.getText());
|
||
break;
|
||
case "Exposure":
|
||
this.iris = Double.parseDouble(((DefaultElement) node).content().get(1).getText());
|
||
break;
|
||
}
|
||
}
|
||
}
|
||
|
||
public ImagingDetail(Double brightness, Double color_saturation, Double contrast, Double sharpness, Double iris) {
|
||
this.brightness = brightness;
|
||
this.color_saturation = color_saturation;
|
||
this.contrast = contrast;
|
||
this.sharpness = sharpness;
|
||
this.iris = iris;
|
||
}
|
||
|
||
public Double getIris() {
|
||
return iris;
|
||
}
|
||
|
||
public void setIris(Double iris) {
|
||
this.iris = iris;
|
||
}
|
||
|
||
public Double getBrightness() {
|
||
return brightness;
|
||
}
|
||
|
||
public void setBrightness(Double brightness) {
|
||
this.brightness = brightness;
|
||
}
|
||
|
||
public Double getColor_saturation() {
|
||
return color_saturation;
|
||
}
|
||
|
||
public void setColor_saturation(Double color_saturation) {
|
||
this.color_saturation = color_saturation;
|
||
}
|
||
|
||
public Double getContrast() {
|
||
return contrast;
|
||
}
|
||
|
||
public void setContrast(Double contrast) {
|
||
this.contrast = contrast;
|
||
}
|
||
|
||
public Double getSharpness() {
|
||
return sharpness;
|
||
}
|
||
|
||
public void setSharpness(Double sharpness) {
|
||
this.sharpness = sharpness;
|
||
}
|
||
}
|
||
```
|
||
|
||
|
||
图像设置服务:
|
||
|
||
|
||
```java
|
||
package com.xiaoma.guard.onvif.imaging;
|
||
|
||
import com.xiaoma.guard.entity.EquipmentModelInfo;
|
||
import com.xiaoma.guard.onvif.OnvifClient;
|
||
import com.xiaoma.guard.onvif.XmlParser;
|
||
import org.dom4j.DocumentException;
|
||
import org.dom4j.Element;
|
||
import org.springframework.beans.factory.annotation.Autowired;
|
||
import org.springframework.http.HttpEntity;
|
||
import org.springframework.http.HttpHeaders;
|
||
import org.springframework.stereotype.Component;
|
||
import org.springframework.web.client.RestTemplate;
|
||
|
||
import java.io.UnsupportedEncodingException;
|
||
|
||
/**
|
||
* @ProjectName:server-assisted-guard-2.0
|
||
* @ClassName:ImagingService
|
||
* @Description:TODO 图像设置
|
||
* @Date:2022/8/10 11:47 上午
|
||
* @Author:z7-x
|
||
*/
|
||
@Component
|
||
public class ImagingService extends OnvifClient {
|
||
|
||
private final static String IMAGING_URL = "http://%s/onvif/imaging_service";
|
||
|
||
@Autowired
|
||
private XmlParser xmlParser;
|
||
@Autowired
|
||
private ImagingXmlParser imagingXmlParser;
|
||
|
||
/**
|
||
* 设置亮度
|
||
*
|
||
* @param deviceManagement
|
||
* @param value
|
||
* @return
|
||
*/
|
||
public void setImagingBrightness(EquipmentModelInfo deviceManagement, Double value) {
|
||
String videoSourceToken = this.getVideoSourceToken(deviceManagement);
|
||
// 构造http请求头
|
||
HttpHeaders headers = this.createHeader();
|
||
HttpEntity<String> formEntity = new HttpEntity<>(imagingXmlParser.getImagingBrightnessXml(deviceManagement, videoSourceToken, value), headers);
|
||
// 发送请求
|
||
RestTemplate restTemplate = new RestTemplate();
|
||
restTemplate.postForObject(String.format(IMAGING_URL, deviceManagement.getIpPortAddress()), formEntity, String.class);
|
||
}
|
||
|
||
/**
|
||
* 设置光圈
|
||
*
|
||
* @param deviceManagement
|
||
* @param value
|
||
* @return
|
||
*/
|
||
public void setImagingIris(EquipmentModelInfo deviceManagement, Double value) {
|
||
}
|
||
|
||
/**
|
||
* 设置焦距
|
||
*
|
||
* @param deviceManagement
|
||
* @param value
|
||
* @return
|
||
*/
|
||
public void setFocus(EquipmentModelInfo deviceManagement, Double value) {
|
||
|
||
}
|
||
|
||
/**
|
||
* 获取实时设置的预设值
|
||
*
|
||
* @return
|
||
*/
|
||
public ImagingDetail getImagingSettings(EquipmentModelInfo deviceManagement) {
|
||
String videoSourceToken = this.getVideoSourceToken(deviceManagement);
|
||
// 构造http请求头
|
||
HttpHeaders headers = this.createHeader();
|
||
HttpEntity<String> formEntity = new HttpEntity<>(imagingXmlParser.getImagingSettingsXml(deviceManagement, videoSourceToken), headers);
|
||
// 发送请求
|
||
RestTemplate restTemplate = new RestTemplate();
|
||
String response = restTemplate.postForObject(String.format(IMAGING_URL, deviceManagement.getIpPortAddress()), formEntity, String.class);
|
||
Element root = null;
|
||
try {
|
||
root = parseXml(response);
|
||
} catch (UnsupportedEncodingException e) {
|
||
e.printStackTrace();
|
||
} catch (DocumentException e) {
|
||
e.printStackTrace();
|
||
}
|
||
return new ImagingDetail(root);
|
||
}
|
||
|
||
/**
|
||
* 获取图像token
|
||
*
|
||
* @param deviceManagement
|
||
* @return
|
||
* @throws Exception
|
||
*/
|
||
public String getVideoSourceToken(EquipmentModelInfo deviceManagement) {
|
||
String token;
|
||
Element root = null;
|
||
// 构造http请求头
|
||
HttpHeaders headers = this.createHeader();
|
||
String tokenXml = null;
|
||
try {
|
||
tokenXml = xmlParser.getTokenXml(deviceManagement);
|
||
HttpEntity<String> formEntity = new HttpEntity<>(tokenXml, headers);
|
||
// 发送请求
|
||
RestTemplate restTemplate = new RestTemplate();
|
||
String resultStr = restTemplate.postForObject(String.format(tokenUrl, deviceManagement.getIpPortAddress()), formEntity, String.class);
|
||
root = parseXml(resultStr);
|
||
} catch (Exception e) {
|
||
e.printStackTrace();
|
||
} finally {
|
||
if (root == null) {
|
||
return "00000";
|
||
}
|
||
token = root.element("Body").element("GetProfilesResponse").elements("Profiles").get(0).element("VideoSourceConfiguration").attribute("token").getText();
|
||
}
|
||
return token;
|
||
|
||
}
|
||
}
|
||
|
||
```
|
||
|
||
|
||
转换ImagingXmlParser类:
|
||
|
||
|
||
```java
|
||
package com.xiaoma.guard.onvif.imaging;
|
||
|
||
import com.xiaoma.guard.entity.EquipmentModelInfo;
|
||
import com.xiaoma.guard.onvif.XmlParser;
|
||
import org.springframework.core.io.ClassPathResource;
|
||
import org.springframework.core.io.Resource;
|
||
import org.springframework.stereotype.Component;
|
||
|
||
import java.util.Map;
|
||
|
||
/**
|
||
* @ProjectName:server-assisted-guard-2.0
|
||
* @ClassName:ImagingXmlParser
|
||
* @Description:TODO
|
||
* @Date:2022/8/10 4:07 下午
|
||
* @Author:z7-x
|
||
*/
|
||
@Component
|
||
public class ImagingXmlParser extends XmlParser {
|
||
|
||
//亮度
|
||
private final static String IMAGING_BRIGHTNESS = "wsdl/imaging_brightness.wsdl";
|
||
//光圈
|
||
private final static String IMAGING_EXPOSURE = "wsdl/imaging_exposure.wsdl";
|
||
//聚焦
|
||
private final static String IMAGING_FOCUS = "wsdl/imaging_focus.wsdl";
|
||
//实时预设值
|
||
private final static String IMAGING_GET_IMAGING_SETTINGS = "wsdl/imaging_get_imaging_settings.wsdl";
|
||
|
||
public static final String BRIGHTNESS = "brightness";
|
||
|
||
/**
|
||
* 拼装实时预设值xml
|
||
*
|
||
* @param deviceManagement
|
||
* @param token
|
||
* @return
|
||
*/
|
||
public String getImagingSettingsXml(EquipmentModelInfo deviceManagement, String token) {
|
||
String result = null;
|
||
try {
|
||
Map<String, String> account = encodeAuth(deviceManagement);
|
||
Resource resource = new ClassPathResource(IMAGING_GET_IMAGING_SETTINGS);
|
||
result = this.getXmlStr(resource, account);
|
||
} catch (Exception e) {
|
||
e.printStackTrace();
|
||
} finally {
|
||
return result.replace(TOKEN, token);
|
||
}
|
||
}
|
||
|
||
/**
|
||
* 拼装亮度xml
|
||
*
|
||
* @param deviceManagement
|
||
* @param token
|
||
* @return
|
||
*/
|
||
public String getImagingBrightnessXml(EquipmentModelInfo deviceManagement, String token, Double value) {
|
||
String result_ = null;
|
||
try {
|
||
Map<String, String> account = encodeAuth(deviceManagement);
|
||
Resource resource = new ClassPathResource(IMAGING_BRIGHTNESS);
|
||
String result = this.getXmlStr(resource, account);
|
||
result_ = result.replace((String.format(REPLACE_PATTERN, BRIGHTNESS)), String.valueOf(value));
|
||
result_ = result_.replace(TOKEN, token);
|
||
} catch (Exception e) {
|
||
e.printStackTrace();
|
||
}
|
||
return result_;
|
||
}
|
||
}
|
||
|
||
```
|
||
|
||
|
||
转换父类XmlParser:
|
||
|
||
|
||
```java
|
||
package com.xiaoma.guard.onvif;
|
||
|
||
import com.xiaoma.guard.entity.EquipmentModelInfo;
|
||
import org.apache.commons.io.IOUtils;
|
||
import org.apache.tomcat.util.codec.binary.Base64;
|
||
import org.springframework.beans.factory.annotation.Value;
|
||
import org.springframework.core.io.ClassPathResource;
|
||
import org.springframework.core.io.Resource;
|
||
import org.springframework.stereotype.Component;
|
||
|
||
import java.io.BufferedReader;
|
||
import java.io.InputStreamReader;
|
||
import java.security.MessageDigest;
|
||
import java.security.NoSuchAlgorithmException;
|
||
import java.text.NumberFormat;
|
||
import java.text.SimpleDateFormat;
|
||
import java.util.*;
|
||
|
||
/**
|
||
* xml解析器
|
||
*
|
||
* @Date:2022/8/10 12:06 上午
|
||
* @Author:z7-x
|
||
*/
|
||
@Component
|
||
public class XmlParser {
|
||
|
||
private static final String RANDOM_SOURCE = "0123456789abcdefghijklmnopqrstuvwxyzABCDEFGHIJKLMNOPQRSTUVWXYZ";
|
||
|
||
private static final String UTC_PATTERN = "yyyy-MM-dd'T'hh:mm:ss'Z'"; // utc时间格式
|
||
|
||
@Value("${spring.template.token-wsdl:wsdl/token.wsdl}")
|
||
private String tokenWsdl; // token请求xml
|
||
|
||
@Value("${spring.template.snapshot-wsdl:wsdl/snapshot.wsdl}")
|
||
private String snapshotWsdl; // 快照请求xml
|
||
|
||
@Value("${spring.template.ptz-detail-wsdl:wsdl/ptz_detail.wsdl}")
|
||
private String ptzDetailWsdl; // 云台位置请求xml
|
||
|
||
@Value("${spring.template.ptz-relative-control-wsdl:wsdl/ptz_relative.wsdl}")
|
||
private String ptzRelativeControlWsdl; // 云台相对控制请求xml
|
||
|
||
@Value("${spring.template.ptz-absolute-control-wsdl:wsdl/ptz_absolute.wsdl}")
|
||
private String ptzAbsoluteControlWsdl; // 云台绝对控制请求xml
|
||
|
||
@Value("${spring.template.stop-wsdl:wsdl/stop.wsdl}")
|
||
private String stopWsdl; // 停止云台控制请求xml
|
||
|
||
public static final String NONCE = "nonce";
|
||
|
||
public static final String PASSWORD = "password";
|
||
|
||
public static final String USER_NAME = "username";
|
||
|
||
public static final String CREATED = "created";
|
||
|
||
public static final String REPLACE_PATTERN = "{%s}";
|
||
|
||
public static final String TOKEN = "{token}";
|
||
|
||
public static final String ENCODE_TYPE = "SHA-1";
|
||
|
||
/**
|
||
* token请求xml转换为字符串
|
||
*
|
||
* @param deviceManagement 设备信息
|
||
*/
|
||
public String getTokenXml(EquipmentModelInfo deviceManagement) throws Exception {
|
||
Map<String, String> account = encodeAuth(deviceManagement);
|
||
Resource resource = new ClassPathResource(tokenWsdl);
|
||
return this.getXmlStr(resource, account);
|
||
}
|
||
|
||
public String getXmlStr(Resource resource, Map<String, String> account) throws Exception {
|
||
BufferedReader reader = null;
|
||
try {
|
||
InputStreamReader isr = new InputStreamReader(resource.getInputStream());
|
||
reader = new BufferedReader(isr);
|
||
StringBuilder sb = new StringBuilder();
|
||
String data = null;
|
||
while ((data = reader.readLine()) != null) {
|
||
sb.append(data);
|
||
}
|
||
reader.close();
|
||
return sb.toString().replace(String.format(REPLACE_PATTERN, USER_NAME), account.get(USER_NAME)).
|
||
replace(String.format(REPLACE_PATTERN, PASSWORD), account.get(PASSWORD)).
|
||
replace(String.format(REPLACE_PATTERN, NONCE), account.get(NONCE)).
|
||
replace(String.format(REPLACE_PATTERN, CREATED), account.get(CREATED));
|
||
} finally {
|
||
IOUtils.closeQuietly(reader);
|
||
}
|
||
|
||
}
|
||
|
||
/**
|
||
* 快照请求xml转为字符串
|
||
*
|
||
* @param deviceManagement 设备信息
|
||
* @param token 鉴权信息
|
||
*/
|
||
public String getSnapshotXml(EquipmentModelInfo deviceManagement, String token) throws Exception {
|
||
Map<String, String> account = encodeAuth(deviceManagement);
|
||
Resource resource = new ClassPathResource(snapshotWsdl);
|
||
String result = this.getXmlStr(resource, account);
|
||
return result.replace(TOKEN, token);
|
||
}
|
||
|
||
/**
|
||
* 云台位置信息请求xml转为字符串
|
||
*
|
||
* @param deviceManagement 设备信息
|
||
* @param token 鉴权信息
|
||
*/
|
||
public String getPtzDetailXml(EquipmentModelInfo deviceManagement, String token) throws Exception {
|
||
Map<String, String> account = encodeAuth(deviceManagement);
|
||
Resource resource = new ClassPathResource(ptzDetailWsdl);
|
||
String result = this.getXmlStr(resource, account);
|
||
return result.replace(TOKEN, token);
|
||
}
|
||
|
||
/**
|
||
* 云台相对控制请求xml转为字符串
|
||
*
|
||
* @param deviceManagement 设备信息
|
||
* @param token 鉴权信息
|
||
* @param ptzDetail 云台信息
|
||
*/
|
||
public String getRelativePtzControlXml(EquipmentModelInfo deviceManagement, String token, PtzDetail ptzDetail) throws Exception {
|
||
return this.getControlXml(deviceManagement, token, ptzDetail, ptzRelativeControlWsdl);
|
||
}
|
||
|
||
/**
|
||
* 云台控制请求xml转为字符串
|
||
*
|
||
* @param deviceManagement 设备信息
|
||
* @param token 鉴权信息
|
||
* @param ptzDetail 云台信息
|
||
* @param template 模板路径
|
||
*/
|
||
private String getControlXml(EquipmentModelInfo deviceManagement, String token, PtzDetail ptzDetail, String template) throws Exception {
|
||
NumberFormat format = NumberFormat.getInstance();
|
||
format.setGroupingUsed(false);
|
||
Map<String, String> account = encodeAuth(deviceManagement);
|
||
Resource resource = new ClassPathResource(template);
|
||
String result = this.getXmlStr(resource, account);
|
||
return result.replace(TOKEN, token).replace("{x}", format.format(ptzDetail.getX())).
|
||
replace("{y}", format.format(ptzDetail.getY())).
|
||
replace("{zoom}", format.format(ptzDetail.getZoom()));
|
||
}
|
||
|
||
/**
|
||
* 云台绝对控制请求xml转为字符串
|
||
*
|
||
* @param deviceManagement 设备信息
|
||
* @param token 鉴权信息
|
||
* @param ptzDetail 云台信息
|
||
*/
|
||
public String getAbsolutePtzControlXml(EquipmentModelInfo deviceManagement, String token, PtzDetail ptzDetail) throws Exception {
|
||
return this.getControlXml(deviceManagement, token, ptzDetail, ptzAbsoluteControlWsdl);
|
||
}
|
||
|
||
/**
|
||
* 停止云台控制请求xml转为字符串
|
||
*
|
||
* @param deviceManagement 设备信息
|
||
* @param token 鉴权信息
|
||
*/
|
||
public String getStopXml(EquipmentModelInfo deviceManagement, String token) throws Exception {
|
||
Map<String, String> account = encodeAuth(deviceManagement);
|
||
Resource resource = new ClassPathResource(stopWsdl);
|
||
String result = this.getXmlStr(resource, account);
|
||
return result.replace(TOKEN, token);
|
||
}
|
||
|
||
/**
|
||
* 获取32位随机数
|
||
*/
|
||
private static String getNonce() {
|
||
Random random = new Random();
|
||
String nonce = "";
|
||
for (int i = 0; i < 32; i++) {
|
||
int index = random.nextInt(RANDOM_SOURCE.length());
|
||
nonce = nonce + RANDOM_SOURCE.charAt(index);
|
||
}
|
||
return nonce;
|
||
}
|
||
|
||
/**
|
||
* 加密鉴权信息
|
||
*
|
||
* @param deviceManagement 设备信息
|
||
*/
|
||
protected static Map<String, String> encodeAuth(EquipmentModelInfo deviceManagement) throws NoSuchAlgorithmException {
|
||
// 生成nonce
|
||
String nonce = getNonce();
|
||
// 生成utc时间
|
||
String time = getUtcTime();
|
||
// 密码加密
|
||
String encodePassword = encodePassword(deviceManagement.getPassword(), time, nonce);
|
||
// 构建鉴权信息
|
||
Map<String, String> result = new HashMap<>();
|
||
result.put(USER_NAME, deviceManagement.getUserName());
|
||
result.put(PASSWORD, encodePassword);
|
||
result.put(NONCE, nonce);
|
||
result.put(CREATED, time);
|
||
return result;
|
||
}
|
||
|
||
/**
|
||
* 获取utc时间
|
||
*/
|
||
private static String getUtcTime() {
|
||
SimpleDateFormat sdf = new SimpleDateFormat(UTC_PATTERN, Locale.getDefault());
|
||
return sdf.format(new Date());
|
||
}
|
||
|
||
/**
|
||
* 密码加密
|
||
*
|
||
* @param password 密码
|
||
* @param time utc时间
|
||
* @param nonce 随机时间
|
||
*/
|
||
private static String encodePassword(String password, String time, String nonce) throws NoSuchAlgorithmException {
|
||
MessageDigest md = MessageDigest.getInstance(ENCODE_TYPE);
|
||
byte[] nonceBytes = Base64.decodeBase64(nonce.getBytes());
|
||
byte[] timeBytes = time.getBytes();
|
||
byte[] passwordBytes = password.getBytes();
|
||
md.update(nonceBytes, 0, nonceBytes.length);
|
||
md.update(timeBytes, 0, timeBytes.length);
|
||
md.update(passwordBytes, 0, passwordBytes.length);
|
||
byte[] bytes = md.digest();
|
||
return new String(Base64.encodeBase64(bytes)).trim();
|
||
}
|
||
|
||
}
|
||
```
|
||
|